
Documentation Index

Fetch the complete documentation index at: https://docs.abundly.ai/llms.txt

Use this file to discover all available pages before exploring further.

Embed your agent as a floating chat bubble on any website. Visitors open the chat, ask questions, and receive streamed AI responses with markdown and images — without leaving your page or needing an Abundly account. Widgets are typically embedded on pages that require login — a customer portal, internal dashboard, or help center — so that only authenticated users can chat. However, you can also use the widget on public-facing pages. A separate daily credit limit can be configured for the widget to control usage independently of the agent’s main limit. Every incoming widget message is also screened by built-in attack detection, which blocks prompt-injection and data-exfiltration attempts before a response reaches the visitor. Widget conversations are stored as full platform chats — they appear in the portal chat list alongside regular and Slack conversations, with complete message history and admin tooling.
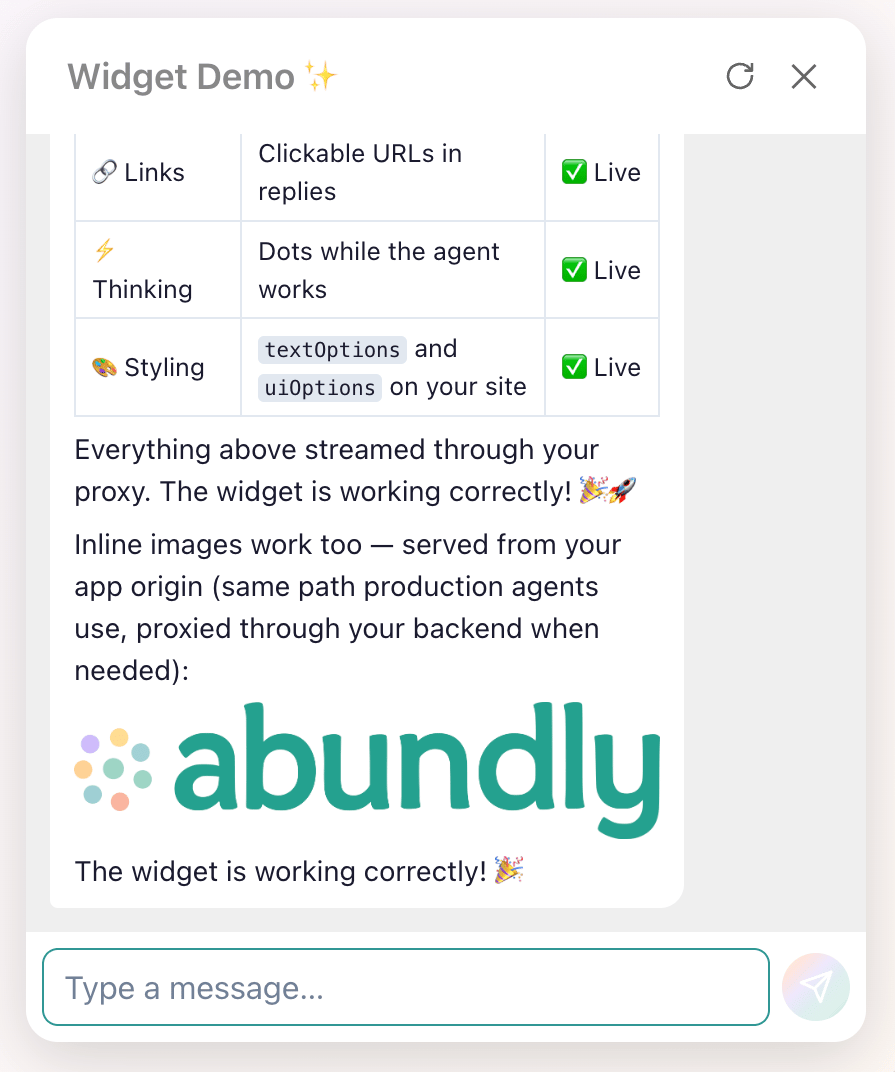
Chat widget panel showing a streamed conversation with markdown, links, images, and a processing indicator
Want to see it in action? The live widget showcase has two interactive demos — the ready-made bubble and a fully custom UI built with createClient. The widget has two modes:
  • Ready-made widget (mountChatWidget) — a complete floating chat bubble and panel with streaming responses, a processing indicator (animated dots while the agent works), markdown rendering, and image support. One function call and you’re done.
  • Custom UI (createClient) — a headless client that handles backend communication, streaming, and markdown rendering while you build the UI entirely yourself.
If you’re using plain HTML, PHP, WordPress, or any non-React stack, you only need a <script> tag pointing at the Abundly-hosted loader — no npm install or build step required. If you’re building a custom UI or working in a React/Next.js project, install the @abundly/widget npm package instead. Both approaches share the same backend proxy contract.
The chat widget is gated behind a workspace feature flag. Contact support@abundly.ai to have it enabled for your workspace.

How it works

The widget never talks to Abundly directly. A server-side proxy on your backend holds the API key and forwards requests to Abundly server-to-server:
Browser  -->  Your backend proxy  --server-to-server-->  Abundly API
              (holds API key)                     X-Agent-Access-Key
This keeps the API key out of client-side code. If the widget should only be available to logged-in users, protect the proxy with your existing authentication. The widget calls three routes on your backend:
RouteMethodForwards to
/statusGET…/widget/status
/chatPOST…/widget/chat (SSE stream)
/images/<path>GET…/widget/images/<path>
All upstream requests use header X-Agent-Access-Key: {API_KEY}. The full upstream URL pattern is {SERVICE_URL}/agents/{AGENT_ID}/widget/{route}. CORS: the widget runs in the visitor’s browser. If backendUrl points to a different origin than the page, your proxy must allow cross-origin requests. A same-origin route (e.g. /api/abundly on the same host) avoids this entirely.

Setting up

1

Configure the agent

In the Abundly portal, open your agent’s Settings → API Access tab. Turn on Enable widget and choose which capabilities the widget may use. Then create an API access key (starts with ak_) in the API Keys section — you’ll store this on your server only.You can also configure:
  • Daily credit limit — a separate cap for widget usage, independent of the agent’s main limit
  • System prompt override — extra instructions for widget conversations only
  • Demo response override — a fixed reply for presentations (skips the LLM)
  • Model override — run widget conversations on a specific model
Depending on your setup, widget users may range from logged-in employees on an internal dashboard to anonymous visitors on a public page. The primary defense is the capability list on the widget itself — only enable what the widget actually needs. As an extra layer against misconfiguration, it’s a good idea to use restrictive settings on the agent’s capabilities in general. For example, setting Update Instructions to chat only ensures it is automatically blocked in widget conversations, even if someone accidentally adds it to the widget’s capability list.
2

Implement the backend proxy

Create a server-side endpoint that the widget can call. It must expose /status, /chat, and /images/<path> under a single base URL. Each route forwards the request to Abundly with your API key.You need three environment variables (values shown in the portal):
VariableDescription
ABUNDLY_SERVICE_URLAbundly service endpoint
ABUNDLY_AGENT_IDYour agent’s ID
ABUNDLY_API_KEYAPI access key (ak_…)
See backend proxy examples below for ready-to-use code in Node.js, Express, Next.js, and PHP.
3

Embed the widget

Add the widget script to your page and mount it, pointing at your backend:
<script src="https://app.abundly.ai/widget.js"></script>
<script>
  Abundly.mountChatWidget({
    backendUrl: "/api/abundly",
    textOptions: {
      bubbleLabel: "Chat with us",
      welcomeMessage: "Hello! How can I help you today?",
    },
  });
</script>
The loader injects the current versioned widget bundle automatically — your snippet stays the same across releases.For React / Next.js, install the npm package instead:
npm install @abundly/widget
"use client";
import { useEffect } from "react";
import { mountChatWidget } from "@abundly/widget";

export default function Page() {
  useEffect(() => {
    const handle = mountChatWidget({ backendUrl: "/api/abundly" });
    return () => handle.unmount();
  }, []);
  return null;
}

Backend proxy examples

Pick your backend language — each example creates a self-contained project you can run locally. The frontend embed code is the same for all of them.
mkdir abundly-widget && cd abundly-widget
mkdir public
Create server.js:
const http = require("http");
const fs = require("fs");
const path = require("path");

const SERVICE_URL = process.env.ABUNDLY_SERVICE_URL;
const AGENT_ID = process.env.ABUNDLY_AGENT_ID;
const API_KEY = process.env.ABUNDLY_API_KEY;
const BASE = `${SERVICE_URL}/agents/${AGENT_ID}/widget`;

const MIME = { ".html": "text/html", ".js": "application/javascript", ".css": "text/css" };

const server = http.createServer(async (req, res) => {
  if (req.method === "GET" && req.url === "/api/abundly/status") {
    const resp = await fetch(`${BASE}/status`, {
      headers: { "X-Agent-Access-Key": API_KEY },
    });
    res.writeHead(resp.status, { "Content-Type": "application/json" });
    res.end(await resp.text());
    return;
  }

  if (req.method === "POST" && req.url === "/api/abundly/chat") {
    const chunks = [];
    for await (const chunk of req) chunks.push(chunk);
    const body = Buffer.concat(chunks).toString();

    const resp = await fetch(`${BASE}/chat`, {
      method: "POST",
      headers: { "Content-Type": "application/json", "X-Agent-Access-Key": API_KEY },
      body,
    });
    res.writeHead(resp.status, {
      "Content-Type": "text/event-stream",
      "Cache-Control": "no-cache",
      Connection: "keep-alive",
    });
    const reader = resp.body.getReader();
    const decoder = new TextDecoder();
    while (true) {
      const { done, value } = await reader.read();
      if (done) break;
      res.write(decoder.decode(value, { stream: true }));
    }
    res.end();
    return;
  }

  if (req.method === "GET" && req.url.startsWith("/api/abundly/images/")) {
    const subPath = req.url.substring("/api/abundly/images/".length);
    const resp = await fetch(`${BASE}/images/${subPath}`, {
      headers: { "X-Agent-Access-Key": API_KEY },
    });
    const headers = {};
    ["content-type", "content-length", "cache-control"].forEach((h) => {
      const v = resp.headers.get(h);
      if (v) headers[h] = v;
    });
    res.writeHead(resp.status, headers);
    const reader = resp.body.getReader();
    while (true) {
      const { done, value } = await reader.read();
      if (done) break;
      res.write(value);
    }
    res.end();
    return;
  }

  const filePath = path.join(__dirname, "public", req.url === "/" ? "index.html" : req.url);
  try {
    const data = fs.readFileSync(filePath);
    res.writeHead(200, { "Content-Type": MIME[path.extname(filePath)] || "text/plain" });
    res.end(data);
  } catch {
    res.writeHead(404);
    res.end("Not found");
  }
});

server.listen(3000, () => console.log("Server running at http://localhost:3000"));
Create public/index.html:
<!DOCTYPE html>
<html lang="en">
<head>
  <meta charset="UTF-8" />
  <meta name="viewport" content="width=device-width, initial-scale=1.0" />
  <title>My Site</title>
</head>
<body>
  <h1>My Website</h1>
  <p>The chat widget should appear in the bottom-right corner.</p>

  <script src="https://app.abundly.ai/widget.js"></script>
  <script>
    Abundly.mountChatWidget({
      backendUrl: "/api/abundly",
      textOptions: {
        placeholder:    "Type a message...",
        bubbleLabel:    "Chat with us",
        headerTitle:    "Chat",
        welcomeMessage: "Hello! How can I help you today?",
      },
    });
  </script>
</body>
</html>
Run:
ABUNDLY_SERVICE_URL=https://service.abundly.ai \
ABUNDLY_AGENT_ID=your_agent_id \
ABUNDLY_API_KEY=ak_your_key \
node server.js
Open http://localhost:3000 (port 8080 for PHP). You should see the chat bubble in the bottom-right corner. Click it, type a message, and see the streamed response from your agent.
These examples are minimal — they forward requests to Abundly but do not authenticate the browser caller. In production, add your own auth middleware (session cookies, JWT verification, etc.) to protect these endpoints.

Configuration

mountChatWidget requires only backendUrl — everything else is optional. Use textOptions to customize labels and uiOptions to match your site’s colors.

Text options

All text options are optional and have sensible defaults.
PropertyDefaultDescription
placeholder”Type a message…”Input field placeholder text
bubbleLabel”Chat about this”Text on the floating bubble
headerTitle”Chat”Title in the chat panel header
welcomeMessage(none)Initial assistant message shown when the chat opens

UI options

All color options are optional and default to brand colors. Values accept any valid CSS — named colors, hex, rgba, or gradients.
PropertyDefaultDescription
bubbleColorBrand gradientFloating bubble background
bubbleHoverColorBubble background on hover
bubbleTextColor#fffText and icon color on the bubble
userBubbleColor#319795User message bubble background
inputBorderColor#319795Text input border when focused
submitColorBrand gradientSend button background
submitHoverColorSend button on hover
submitDisabledColorSend button when disabled
headerColorChat panel header background
headerTextColor#888Header text and close button color
linkColor#0d7a6eLink color in assistant messages

What the ready-made widget handles

mountChatWidget takes care of these concerns automatically:
  • Availability check — calls /status before showing the bubble; stays hidden if the agent is unavailable or the daily limit is exhausted
  • SSE streaming — character-by-character reveal animation as the response arrives
  • Processing indicator — animated dots while the agent is working (tools, sub-agents, or waiting for a response). Internal reasoning text is never shown in the widget.
  • Markdown rendering — safe HTML output with XSS protection
  • Image support — URL rewriting, preloading, and authenticated image loading through the proxy
  • Mobile layout — soft-keyboard detection and layout adjustment
  • Auto-resizing input — textarea grows up to three lines
  • Rate limiting — displays errors and suspends input on HTTP 429
mountChatWidget returns a handle with two methods:
MethodDescription
handle.reset()Clears conversation history, errors, and suspended state. Restores the welcome message if configured.
handle.unmount()Removes bubble, panel, backdrop, and injected styles. Idempotent, safe to call at any time.

Custom UI with createClient

If you need full control over the chat interface — your own layout, animations, or interaction model — use createClient instead of mountChatWidget. It provides the same streaming and protocol engine without any DOM or styles.
import { createClient } from "@abundly/widget";

const client = createClient("/api/abundly");
Or via script tag:
<script src="https://app.abundly.ai/widget.js"></script>
<script>
  const client = Abundly.createClient("/api/abundly");
</script>
The client exposes, among other things:
  • client.checkStatus() — check if the agent is available
  • client.sendMessage(text, callbacks) — stream a response via SSE with onChunk, onProcessing, onDone, and onStreamError callbacks
  • client.resetSession() — clear the server-side session so the next message starts a new conversation
  • client.renderMarkdown(text) — convert markdown to safe HTML (optional — use your own library instead if you prefer)
  • client.stripPartialMd(text) — clean up half-formed markdown tokens during streaming
Conversation history is persisted server-side — you only need a local Message[] for rendering your UI. The client handles protocol details, session management, URL rewriting, and optionally markdown rendering. You own all markup and styling.
The methods listed above are the most commonly used — the full client API includes additional helpers for image authentication, blob URL management, and more. See the @abundly/widget package on npm for the complete reference.
The usual flow for a custom UI:
  1. Backend first — same proxy as above (/status, /chat, /images/<path>)
  2. Install the SDKnpm install @abundly/widget
  3. Create a clientconst client = createClient("/api/abundly")
  4. Build your component — use client.sendMessage for streaming, client.renderMarkdown for replies, client.checkStatus for availability. Authenticated proxies and inline images require additional client helpers — see the npm package docs for details
  5. Ship it — mount wherever it should live; no mountChatWidget required
"use client";
import { useState } from "react";
import { createClient, type Message } from "@abundly/widget";

const client = createClient("/api/abundly");

export function MyChat() {
  const [messages, setMessages] = useState<Message[]>([]);
  const [streaming, setStreaming] = useState("");
  const [draft, setDraft] = useState("");

  async function send() {
    const text = draft.trim();
    if (!text) return;
    setDraft("");
    setMessages((prev) => [...prev, { role: "user", content: text }]);
    setStreaming("");
    // No need to pass conversation history — the server tracks it
    // via a session ID that the client manages automatically.
    const final = await client.sendMessage(text, {
      onChunk: (accumulated) => setStreaming(accumulated),
    });
    setStreaming("");
    setMessages((prev) => [...prev, { role: "assistant", content: final }]);
  }

  function resetChat() {
    client.resetSession();
    setMessages([]);
  }

  return (
    <div>
      {messages.map((m, i) => (
        <div key={i} className={m.role}>
          {m.role === "user" ? (
            m.content
          ) : (
            <div dangerouslySetInnerHTML={{
              __html: client.renderMarkdown(m.content),
            }} />
          )}
        </div>
      ))}
      {streaming && (
        <div className="assistant">
          <div dangerouslySetInnerHTML={{
            __html: client.renderMarkdown(client.stripPartialMd(streaming)),
          }} />
        </div>
      )}
      <input value={draft} onChange={(e) => setDraft(e.target.value)} />
      <button onClick={send}>Send</button>
      <button onClick={resetChat}>New chat</button>
    </div>
  );
}
For the full API reference, implementation help, TypeScript types, image auth helpers, and markdown renderer comparison, see @abundly/widget on npm.

Authentication

If your proxy is same-origin and uses session cookies, no extra configuration is needed — cookies flow automatically. For token-based or cross-origin setups, pass headers and/or credentials on the mount call. Both mountChatWidget and createClient accept the same options.
Use the function form so the token is re-read on every request:
mountChatWidget({
  backendUrl: "/api/abundly",
  headers: async () => ({
    Authorization: `Bearer ${await getAccessToken()}`,
  }),
});
headers is applied to every request the widget makes (/status, /chat, and image loads). User-supplied headers override built-in headers with the same name. credentials maps directly to the fetch option.

Learn more

API Access

Configure API keys, HTTP endpoints, MCP, and webhooks alongside the widget

@abundly/widget on npm

Full API reference, TypeScript types, and advanced customization

Monitoring

Review widget conversations in the portal chat list and monitor credit usage