> ## Documentation Index
> Fetch the complete documentation index at: https://docs.abundly.ai/llms.txt
> Use this file to discover all available pages before exploring further.
# Platform Overview
> A quick tour of the Abundly interface
When you log in to Abundly, you'll land on the **Workspace page** — your home base for creating and managing AI agents and workspace members.
## Workspace page
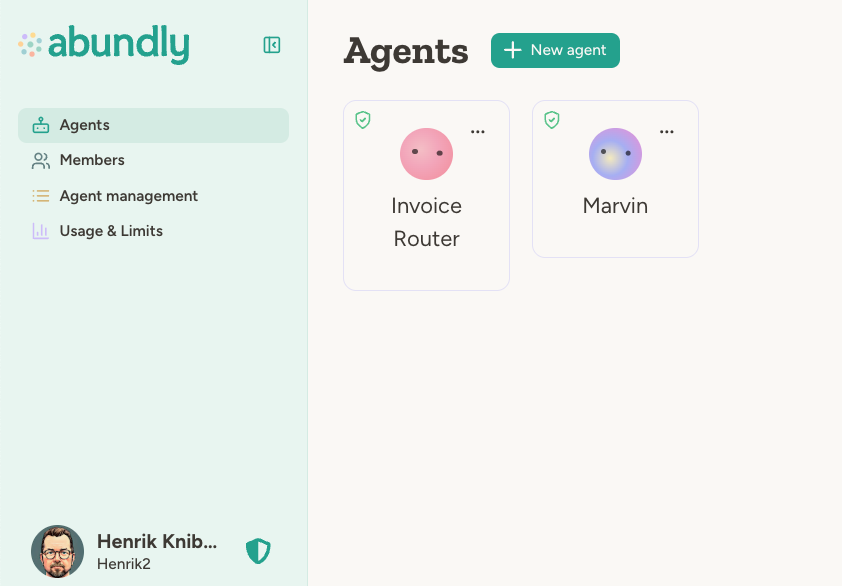 This is where you see all agents in your workspace. The page organizes agents into sections to help you find what you need faster:
* **Starred** — Agents you've bookmarked for quick access. Star an agent from its card.
* **Recently Used** — Agents you've opened recently (you can hide this section from your preferences).
* **All agents** — A flat, searchable list with an A–Z / Recent-first sort toggle.
You can filter by tag, search by name, and the filter state persists in the URL. Click **+ New agent** to create one.
The left sidebar provides access to workspace-level features:
* **Agents** — The main view showing all agents for you and your workspace
* **Members** — Invite colleagues and manage who has access to what
* **Management** — A dedicated section for admin-oriented tools, including **Agent management** (security, access controls) and **Usage & Limits** (credit monitoring and spending limits).
* **Help & support** — Links to documentation, the changelog, contact support, service status, and more
You can get back to the workspace page at any time by clicking the Abundly logo in the top left.
## Agent page
When you click on an agent, you'll be taken to the agent page. There you can configure, monitor, and interact with the agent.
This is where you see all agents in your workspace. The page organizes agents into sections to help you find what you need faster:
* **Starred** — Agents you've bookmarked for quick access. Star an agent from its card.
* **Recently Used** — Agents you've opened recently (you can hide this section from your preferences).
* **All agents** — A flat, searchable list with an A–Z / Recent-first sort toggle.
You can filter by tag, search by name, and the filter state persists in the URL. Click **+ New agent** to create one.
The left sidebar provides access to workspace-level features:
* **Agents** — The main view showing all agents for you and your workspace
* **Members** — Invite colleagues and manage who has access to what
* **Management** — A dedicated section for admin-oriented tools, including **Agent management** (security, access controls) and **Usage & Limits** (credit monitoring and spending limits).
* **Help & support** — Links to documentation, the changelog, contact support, service status, and more
You can get back to the workspace page at any time by clicking the Abundly logo in the top left.
## Agent page
When you click on an agent, you'll be taken to the agent page. There you can configure, monitor, and interact with the agent.
 ### Agent selector
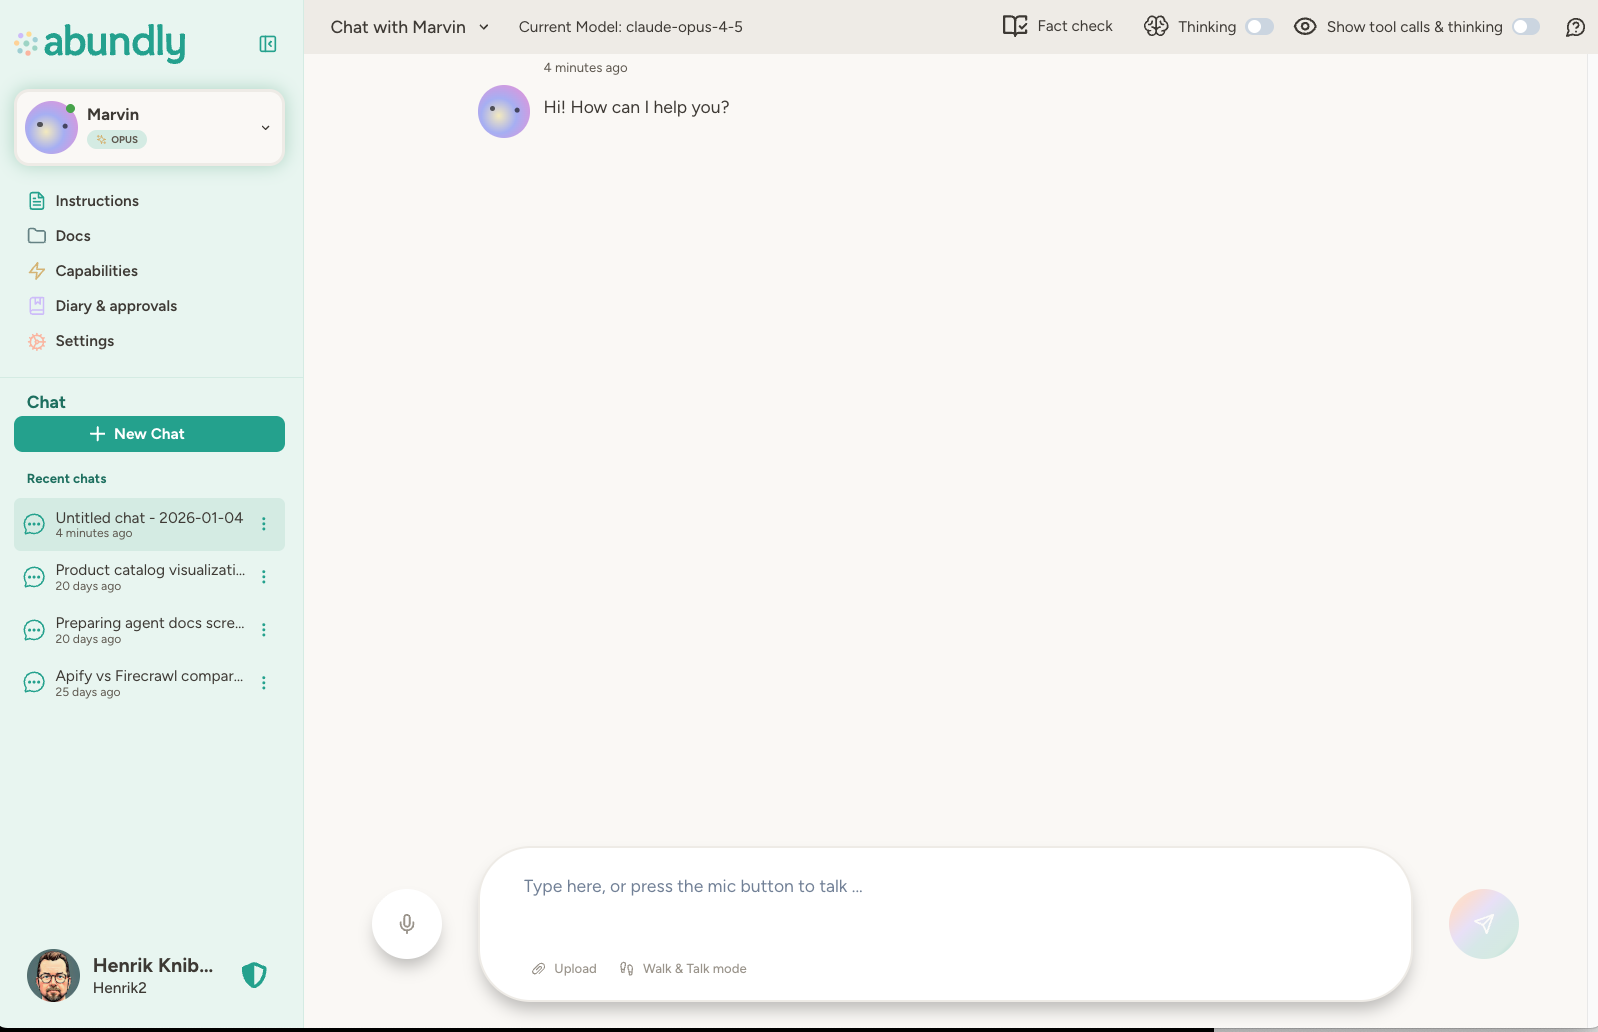
The agent selector dropdown at the top left lets you quickly switch between agents.
### Sidebar links
These sidebar links let you configure and monitor the agent:
* **[Instructions](/features/instructions)** — The agent's job description and behavioral guidelines
* **[Docs](/features/documents)** — Files and documents the agent can reference
* **[Capabilities](/features/capabilities)** — Configure [integrations](/integrations/overview) and [MCP servers](/integrations/mcp) for your agent.
* **[Activity](/features/monitoring)** — Activity log and pending approval requests
* **Settings** — Agent configuration and advanced options:
* Basic information — Name, avatar, and description.
* Communication — Email address and chat start message
* Usage & Limits — Daily credit usage and limits
* Actions — Turn agent on/off, clone, delete
* [Agent-to-agent communication](/features/multi-agent) — Configure which other agents this agent can communicate with
* [User access](/security/access-control) — Control which workspace or team members can access this agent
* [API access](/features/agent-api-endpoint) — Expose your agent as an HTTP API, an MCP server, or a webhook receiver
* Public sharing — Make this agent available for others to clone
* Alarms — Monitor which tasks the agent has scheduled for itself
* Advanced config — [Model selection](/features/model-selection), per-context thinking settings, and more
### Chat links
Below the sidebar are the chat links:
* **+ New Chat** — Start a fresh conversation with the agent
* **Recent chats** — Access previous conversations to continue where you left off
### Chat
The main area where you interact with your agent. The chat input at the bottom lets you:
* **Type messages** — Just like any chat interface
* **[Use voice](/features/voice)** — Click the mic button to speak instead of type
* **Upload files** — Share documents, images, or data for the agent to process (you can also drag and drop files into the chat)
* **Walk & Talk mode** — Have a mostly hands-free conversation while moving around
See [Chat](/features/chat) for more details.
### Chat settings
The top bar shows the current AI model and provides toggles and links to chat features:
* **Chat documents** - Opens the chat document panel so you can browse files connected to the current conversation.
* **Help** - Opens contextual help for the chat experience.
* **Thinking** - Turning this on makes the agent think out loud before responding, which can improve quality but can be slower.
* **Show tool calls and thinking** - Shows details about the tools the agent is using, and the agent's reasoning process (if thinking is enabled). Useful for getting a better understanding of how the agent is working.
If you want thinking to be on by default for new chats, you can configure that in Advanced Config under Settings.
### Account menu
Click your profile image at the bottom left to access personal settings, switch workspaces (if you are a member of multiple workspaces), or sign out.
## Next steps
Create your first agent step by step
Learn how to configure agent behavior
Explore available tools and integrations
Deep dive into the chat interface
### Agent selector
The agent selector dropdown at the top left lets you quickly switch between agents.
### Sidebar links
These sidebar links let you configure and monitor the agent:
* **[Instructions](/features/instructions)** — The agent's job description and behavioral guidelines
* **[Docs](/features/documents)** — Files and documents the agent can reference
* **[Capabilities](/features/capabilities)** — Configure [integrations](/integrations/overview) and [MCP servers](/integrations/mcp) for your agent.
* **[Activity](/features/monitoring)** — Activity log and pending approval requests
* **Settings** — Agent configuration and advanced options:
* Basic information — Name, avatar, and description.
* Communication — Email address and chat start message
* Usage & Limits — Daily credit usage and limits
* Actions — Turn agent on/off, clone, delete
* [Agent-to-agent communication](/features/multi-agent) — Configure which other agents this agent can communicate with
* [User access](/security/access-control) — Control which workspace or team members can access this agent
* [API access](/features/agent-api-endpoint) — Expose your agent as an HTTP API, an MCP server, or a webhook receiver
* Public sharing — Make this agent available for others to clone
* Alarms — Monitor which tasks the agent has scheduled for itself
* Advanced config — [Model selection](/features/model-selection), per-context thinking settings, and more
### Chat links
Below the sidebar are the chat links:
* **+ New Chat** — Start a fresh conversation with the agent
* **Recent chats** — Access previous conversations to continue where you left off
### Chat
The main area where you interact with your agent. The chat input at the bottom lets you:
* **Type messages** — Just like any chat interface
* **[Use voice](/features/voice)** — Click the mic button to speak instead of type
* **Upload files** — Share documents, images, or data for the agent to process (you can also drag and drop files into the chat)
* **Walk & Talk mode** — Have a mostly hands-free conversation while moving around
See [Chat](/features/chat) for more details.
### Chat settings
The top bar shows the current AI model and provides toggles and links to chat features:
* **Chat documents** - Opens the chat document panel so you can browse files connected to the current conversation.
* **Help** - Opens contextual help for the chat experience.
* **Thinking** - Turning this on makes the agent think out loud before responding, which can improve quality but can be slower.
* **Show tool calls and thinking** - Shows details about the tools the agent is using, and the agent's reasoning process (if thinking is enabled). Useful for getting a better understanding of how the agent is working.
If you want thinking to be on by default for new chats, you can configure that in Advanced Config under Settings.
### Account menu
Click your profile image at the bottom left to access personal settings, switch workspaces (if you are a member of multiple workspaces), or sign out.
## Next steps
Create your first agent step by step
Learn how to configure agent behavior
Explore available tools and integrations
Deep dive into the chat interface