> ## Documentation Index
> Fetch the complete documentation index at: https://docs.abundly.ai/llms.txt
> Use this file to discover all available pages before exploring further.

# Chat Widget

> Embed an AI-powered chat bubble on any website with a secure backend proxy

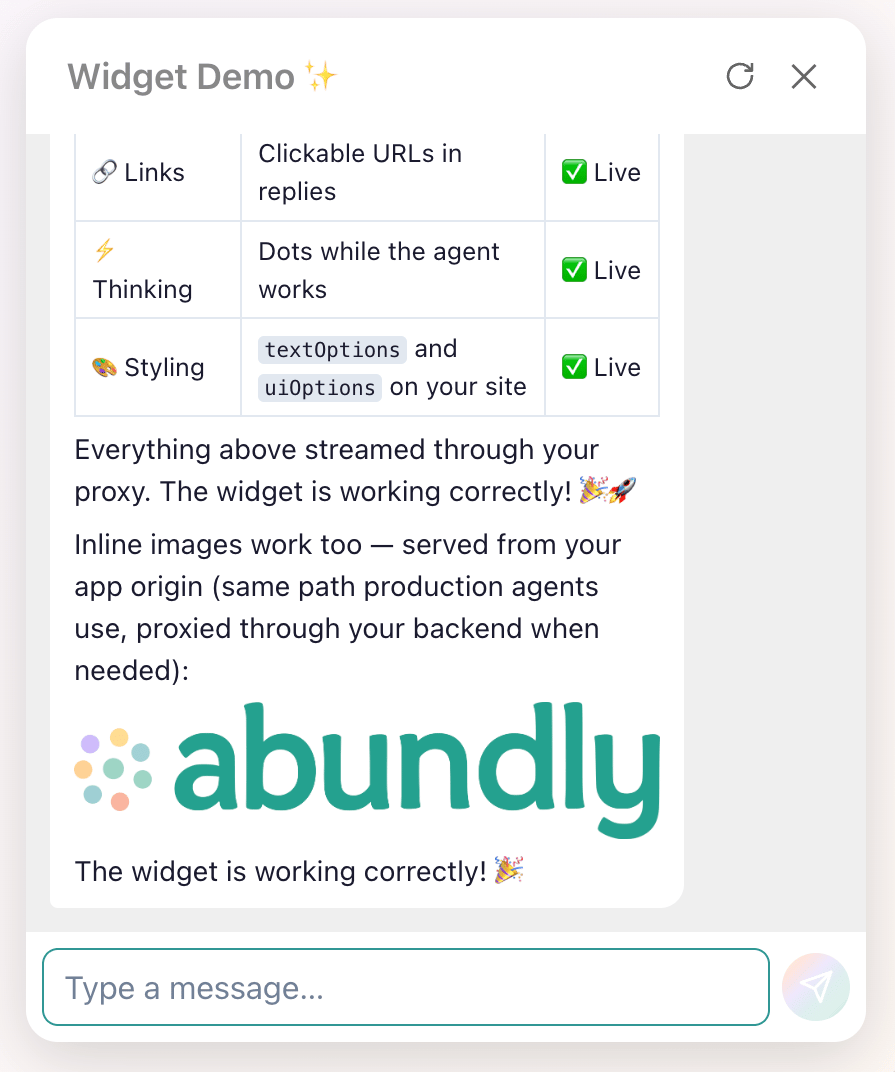
Embed your agent as a floating chat bubble on any website. Visitors open the chat, ask questions, and receive streamed AI responses with markdown and images — without leaving your page or needing an Abundly account. Widgets are typically embedded on pages that require login — a customer portal, internal dashboard, or help center — so that only authenticated users can chat. However, you can also use the widget on public-facing pages. A separate daily credit limit can be configured for the widget to control usage independently of the agent's main limit. Every incoming widget message is also screened by built-in attack detection, which blocks prompt-injection and data-exfiltration attempts before a response reaches the visitor. Widget conversations are stored as full platform chats — they appear in the portal chat list alongside regular and Slack conversations, with complete message history and admin tooling.

<Frame>
  <img src="https://mintcdn.com/abundly/1Vcuy8bdCdtsIDhY/images/chat-widget-example.png?fit=max&auto=format&n=1Vcuy8bdCdtsIDhY&q=85&s=2c24b2b4324fc6af92e85eca6127c9f3" alt="Chat widget panel showing a streamed conversation with markdown, links, images, and a processing indicator" style={{ maxWidth: "380px" }} width="895" height="1072" data-path="images/chat-widget-example.png" />
</Frame>

Want to see it in action? The [live widget showcase](https://app.abundly.ai/widget-showcase) has two interactive demos — the ready-made bubble and a fully custom UI built with `createClient`.

The widget has two modes:

* **Ready-made widget** (`mountChatWidget`) — a complete floating chat bubble and panel with streaming responses, a processing indicator (animated dots while the agent works), markdown rendering, and image support. One function call and you're done.
* **Custom UI** (`createClient`) — a headless client that handles backend communication, streaming, and markdown rendering while you build the UI entirely yourself.

If you're using plain HTML, PHP, WordPress, or any non-React stack, you only need a `<script>` tag pointing at the [Abundly-hosted loader](https://app.abundly.ai/widget.js) — no npm install or build step required. If you're building a custom UI or working in a React/Next.js project, install the [`@abundly/widget`](https://www.npmjs.com/package/@abundly/widget) npm package instead. Both approaches share the same backend proxy contract.

<Warning>
  The chat widget is gated behind a workspace feature flag. Contact [support@abundly.ai](mailto:support@abundly.ai) to have it enabled for your workspace.
</Warning>

## How it works

The widget never talks to Abundly directly. A server-side proxy on your backend holds the API key and forwards requests to Abundly server-to-server:

```
Browser  -->  Your backend proxy  --server-to-server-->  Abundly API
              (holds API key)                     X-Agent-Access-Key
```

This keeps the API key out of client-side code. If the widget should only be available to logged-in users, protect the proxy with your existing authentication.

The widget calls three routes on your backend:

| Route            | Method | Forwards to                  |
| ---------------- | ------ | ---------------------------- |
| `/status`        | GET    | `…/widget/status`            |
| `/chat`          | POST   | `…/widget/chat` (SSE stream) |
| `/images/<path>` | GET    | `…/widget/images/<path>`     |

All upstream requests use header `X-Agent-Access-Key: {API_KEY}`. The full upstream URL pattern is `{SERVICE_URL}/agents/{AGENT_ID}/widget/{route}`.

**CORS:** the widget runs in the visitor's browser. If `backendUrl` points to a different origin than the page, your proxy must allow cross-origin requests. A same-origin route (e.g. `/api/abundly` on the same host) avoids this entirely.

## Setting up

<Steps>
  <Step title="Configure the agent">
    In the Abundly portal, open your agent's **Settings → API Access** tab. Turn on **Enable widget** and choose which capabilities the widget may use. The agent's API Capabilities and MCP servers are listed separately in the same picker — like capabilities, they are unavailable in widget conversations unless selected. Then create an **API access key** (starts with `ak_`) in the API Keys section — you'll store this on your server only.

    You can also configure:

    * **Daily credit limit** — a separate cap for widget usage, independent of the agent's main limit
    * **Widget instructions** — dedicated instructions for widget conversations, replacing the agent's main instructions (if empty, the agent's default instructions are used)
    * **Demo response override** — a fixed reply for presentations (skips the LLM)
    * **Model override** — run widget conversations on a specific model

    <Tip>
      Depending on your setup, widget users may range from logged-in employees on an internal dashboard to anonymous visitors on a public page. The primary defense is the **capability list on the widget itself** — only enable what the widget actually needs. As an extra layer against misconfiguration, it's a good idea to use restrictive settings on the agent's capabilities in general. For example, setting **Update Instructions** to **chat only** ensures it is automatically blocked in widget conversations, even if someone accidentally adds it to the widget's capability list.
    </Tip>
  </Step>

  <Step title="Implement the backend proxy">
    Create a server-side endpoint that the widget can call. It must expose `/status`, `/chat`, and `/images/<path>` under a single base URL. Each route forwards the request to Abundly with your API key.

    You need three environment variables (values shown in the portal):

    | Variable              | Description              |
    | --------------------- | ------------------------ |
    | `ABUNDLY_SERVICE_URL` | Abundly service endpoint |
    | `ABUNDLY_AGENT_ID`    | Your agent's ID          |
    | `ABUNDLY_API_KEY`     | API access key (`ak_…`)  |

    See [backend proxy examples](#backend-proxy-examples) below for ready-to-use code in Node.js, Express, Next.js, and PHP.
  </Step>

  <Step title="Embed the widget">
    Add the widget script to your page and mount it, pointing at your backend:

    ```html theme={null}
    <script src="https://app.abundly.ai/widget.js"></script>
    <script>
      Abundly.mountChatWidget({
        backendUrl: "/api/abundly",
        textOptions: {
          bubbleLabel: "Chat with us",
          welcomeMessage: "Hello! How can I help you today?",
        },
      });
    </script>
    ```

    The loader injects the current versioned widget bundle automatically — your snippet stays the same across releases.

    For **React / Next.js**, install the npm package instead:

    ```bash theme={null}
    npm install @abundly/widget
    ```

    ```tsx theme={null}
    "use client";
    import { useEffect } from "react";
    import { mountChatWidget } from "@abundly/widget";

    export default function Page() {
      useEffect(() => {
        const handle = mountChatWidget({ backendUrl: "/api/abundly" });
        return () => handle.unmount();
      }, []);
      return null;
    }
    ```
  </Step>
</Steps>

## Backend proxy examples

Pick your backend language — each example creates a self-contained project you can run locally. The frontend embed code is the same for all of them.

<Tabs>
  <Tab title="Node.js">
    ```bash theme={null}
    mkdir abundly-widget && cd abundly-widget
    mkdir public
    ```

    Create `server.js`:

    ```js theme={null}
    const http = require("http");
    const fs = require("fs");
    const path = require("path");

    const SERVICE_URL = process.env.ABUNDLY_SERVICE_URL;
    const AGENT_ID = process.env.ABUNDLY_AGENT_ID;
    const API_KEY = process.env.ABUNDLY_API_KEY;
    const BASE = `${SERVICE_URL}/agents/${AGENT_ID}/widget`;

    const MIME = { ".html": "text/html", ".js": "application/javascript", ".css": "text/css" };

    const server = http.createServer(async (req, res) => {
      if (req.method === "GET" && req.url === "/api/abundly/status") {
        const resp = await fetch(`${BASE}/status`, {
          headers: { "X-Agent-Access-Key": API_KEY },
        });
        res.writeHead(resp.status, { "Content-Type": "application/json" });
        res.end(await resp.text());
        return;
      }

      if (req.method === "POST" && req.url === "/api/abundly/chat") {
        const chunks = [];
        for await (const chunk of req) chunks.push(chunk);
        const body = Buffer.concat(chunks).toString();

        const resp = await fetch(`${BASE}/chat`, {
          method: "POST",
          headers: { "Content-Type": "application/json", "X-Agent-Access-Key": API_KEY },
          body,
        });
        res.writeHead(resp.status, {
          "Content-Type": "text/event-stream",
          "Cache-Control": "no-cache",
          Connection: "keep-alive",
        });
        const reader = resp.body.getReader();
        const decoder = new TextDecoder();
        while (true) {
          const { done, value } = await reader.read();
          if (done) break;
          res.write(decoder.decode(value, { stream: true }));
        }
        res.end();
        return;
      }

      if (req.method === "GET" && req.url.startsWith("/api/abundly/images/")) {
        const subPath = req.url.substring("/api/abundly/images/".length);
        const resp = await fetch(`${BASE}/images/${subPath}`, {
          headers: { "X-Agent-Access-Key": API_KEY },
        });
        const headers = {};
        ["content-type", "content-length", "cache-control"].forEach((h) => {
          const v = resp.headers.get(h);
          if (v) headers[h] = v;
        });
        res.writeHead(resp.status, headers);
        const reader = resp.body.getReader();
        while (true) {
          const { done, value } = await reader.read();
          if (done) break;
          res.write(value);
        }
        res.end();
        return;
      }

      const filePath = path.join(__dirname, "public", req.url === "/" ? "index.html" : req.url);
      try {
        const data = fs.readFileSync(filePath);
        res.writeHead(200, { "Content-Type": MIME[path.extname(filePath)] || "text/plain" });
        res.end(data);
      } catch {
        res.writeHead(404);
        res.end("Not found");
      }
    });

    server.listen(3000, () => console.log("Server running at http://localhost:3000"));
    ```

    Create `public/index.html`:

    ```html theme={null}
    <!DOCTYPE html>
    <html lang="en">
    <head>
      <meta charset="UTF-8" />
      <meta name="viewport" content="width=device-width, initial-scale=1.0" />
      <title>My Site</title>
    </head>
    <body>
      <h1>My Website</h1>
      <p>The chat widget should appear in the bottom-right corner.</p>

      <script src="https://app.abundly.ai/widget.js"></script>
      <script>
        Abundly.mountChatWidget({
          backendUrl: "/api/abundly",
          textOptions: {
            placeholder:    "Type a message...",
            bubbleLabel:    "Chat with us",
            headerTitle:    "Chat",
            welcomeMessage: "Hello! How can I help you today?",
          },
        });
      </script>
    </body>
    </html>
    ```

    Run:

    ```bash theme={null}
    ABUNDLY_SERVICE_URL=https://service.abundly.ai \
    ABUNDLY_AGENT_ID=your_agent_id \
    ABUNDLY_API_KEY=ak_your_key \
    node server.js
    ```
  </Tab>

  <Tab title="Express.js">
    ```bash theme={null}
    mkdir abundly-widget && cd abundly-widget
    npm init -y
    npm install express
    ```

    Create `server.js`:

    ```js theme={null}
    const express = require("express");
    const path = require("path");
    const app = express();

    const SERVICE_URL = process.env.ABUNDLY_SERVICE_URL;
    const AGENT_ID = process.env.ABUNDLY_AGENT_ID;
    const API_KEY = process.env.ABUNDLY_API_KEY;
    const BASE = `${SERVICE_URL}/agents/${AGENT_ID}/widget`;

    app.use(express.static(path.join(__dirname, "public")));
    app.use(express.json());

    app.get("/api/abundly/status", async (_req, res) => {
      const resp = await fetch(`${BASE}/status`, {
        headers: { "X-Agent-Access-Key": API_KEY },
      });
      res.status(resp.status).json(await resp.json());
    });

    app.post("/api/abundly/chat", async (req, res) => {
      const resp = await fetch(`${BASE}/chat`, {
        method: "POST",
        headers: { "Content-Type": "application/json", "X-Agent-Access-Key": API_KEY },
        body: JSON.stringify(req.body),
      });
      res.writeHead(resp.status, {
        "Content-Type": "text/event-stream",
        "Cache-Control": "no-cache",
        Connection: "keep-alive",
      });
      const reader = resp.body.getReader();
      const decoder = new TextDecoder();
      while (true) {
        const { done, value } = await reader.read();
        if (done) break;
        res.write(decoder.decode(value, { stream: true }));
      }
      res.end();
    });

    app.get("/api/abundly/images/*", async (req, res) => {
      const subPath = req.params[0];
      const resp = await fetch(`${BASE}/images/${subPath}`, {
        headers: { "X-Agent-Access-Key": API_KEY },
      });
      ["content-type", "content-length", "cache-control"].forEach((h) => {
        const v = resp.headers.get(h);
        if (v) res.setHeader(h, v);
      });
      res.status(resp.status);
      const reader = resp.body.getReader();
      while (true) {
        const { done, value } = await reader.read();
        if (done) break;
        res.write(value);
      }
      res.end();
    });

    app.listen(3000, () => console.log("Server running at http://localhost:3000"));
    ```

    Create `public/index.html`:

    ```html theme={null}
    <!DOCTYPE html>
    <html lang="en">
    <head>
      <meta charset="UTF-8" />
      <meta name="viewport" content="width=device-width, initial-scale=1.0" />
      <title>My Site</title>
    </head>
    <body>
      <h1>My Website</h1>
      <p>The chat widget should appear in the bottom-right corner.</p>

      <script src="https://app.abundly.ai/widget.js"></script>
      <script>
        Abundly.mountChatWidget({
          backendUrl: "/api/abundly",
          textOptions: {
            placeholder:    "Type a message...",
            bubbleLabel:    "Chat with us",
            headerTitle:    "Chat",
            welcomeMessage: "Hello! How can I help you today?",
          },
        });
      </script>
    </body>
    </html>
    ```

    Run:

    ```bash theme={null}
    ABUNDLY_SERVICE_URL=https://service.abundly.ai \
    ABUNDLY_AGENT_ID=your_agent_id \
    ABUNDLY_API_KEY=ak_your_key \
    node server.js
    ```
  </Tab>

  <Tab title="Next.js">
    ```bash theme={null}
    npx create-next-app@latest abundly-widget --app --typescript
    cd abundly-widget
    npm install @abundly/widget
    ```

    Create `app/api/abundly/[...path]/route.ts`:

    ```ts theme={null}
    const SERVICE_URL = process.env.ABUNDLY_SERVICE_URL!;
    const AGENT_ID = process.env.ABUNDLY_AGENT_ID!;
    const API_KEY = process.env.ABUNDLY_API_KEY!;
    const BASE = `${SERVICE_URL}/agents/${AGENT_ID}/widget`;

    export async function GET(
      _req: Request,
      context: { params: Promise<{ path: string[] }> },
    ) {
      const { path } = await context.params;
      const [first, ...rest] = path;

      if (first === "status") {
        const resp = await fetch(`${BASE}/status`, {
          headers: { "X-Agent-Access-Key": API_KEY },
        });
        return Response.json(await resp.json(), { status: resp.status });
      }

      if (first === "images") {
        const resp = await fetch(`${BASE}/images/${rest.join("/")}`, {
          headers: { "X-Agent-Access-Key": API_KEY },
        });
        const headers = new Headers();
        ["content-type", "content-length", "cache-control"].forEach((h) => {
          const v = resp.headers.get(h);
          if (v) headers.set(h, v);
        });
        return new Response(resp.body, { status: resp.status, headers });
      }

      return Response.json({ error: "Not found" }, { status: 404 });
    }

    export async function POST(
      req: Request,
      context: { params: Promise<{ path: string[] }> },
    ) {
      const { path } = await context.params;
      if (path[0] !== "chat")
        return Response.json({ error: "Not found" }, { status: 404 });

      const resp = await fetch(`${BASE}/chat`, {
        method: "POST",
        headers: {
          "Content-Type": "application/json",
          "X-Agent-Access-Key": API_KEY,
        },
        body: JSON.stringify(await req.json()),
      });

      return new Response(resp.body, {
        status: resp.status,
        headers: {
          "Content-Type": "text/event-stream",
          "Cache-Control": "no-cache",
        },
      });
    }
    ```

    Add to `.env.local`:

    ```
    ABUNDLY_SERVICE_URL=https://service.abundly.ai
    ABUNDLY_AGENT_ID=your_agent_id
    ABUNDLY_API_KEY=ak_your_key
    ```

    Mount the widget in `app/page.tsx`:

    ```tsx theme={null}
    "use client";
    import { useEffect } from "react";
    import { mountChatWidget } from "@abundly/widget";

    export default function Home() {
      useEffect(() => {
        const handle = mountChatWidget({
          backendUrl: "/api/abundly",
          textOptions: {
            bubbleLabel: "Chat with us",
            welcomeMessage: "Hello! How can I help you today?",
          },
        });
        return () => handle.unmount();
      }, []);

      return (
        <main>
          <h1>My Website</h1>
          <p>The chat widget should appear in the bottom-right corner.</p>
        </main>
      );
    }
    ```

    Run with `npm run dev`.
  </Tab>

  <Tab title="PHP">
    ```bash theme={null}
    mkdir abundly-widget && cd abundly-widget
    mkdir api
    ```

    Create `api/abundly.php`:

    ```php theme={null}
    <?php
    $SERVICE_URL = getenv("ABUNDLY_SERVICE_URL");
    $AGENT_ID    = getenv("ABUNDLY_AGENT_ID");
    $API_KEY     = getenv("ABUNDLY_API_KEY");
    $BASE        = "$SERVICE_URL/agents/$AGENT_ID/widget";

    $path   = parse_url($_SERVER["REQUEST_URI"], PHP_URL_PATH);
    $method = $_SERVER["REQUEST_METHOD"];

    if ($method === "GET" && $path === "/api/abundly/status") {
        $ch = curl_init("$BASE/status");
        curl_setopt_array($ch, [
            CURLOPT_HTTPHEADER     => ["X-Agent-Access-Key: $API_KEY"],
            CURLOPT_RETURNTRANSFER => true,
        ]);
        $body = curl_exec($ch);
        $code = curl_getinfo($ch, CURLINFO_HTTP_CODE);
        curl_close($ch);
        http_response_code($code);
        header("Content-Type: application/json");
        echo $body;

    } elseif ($method === "POST" && $path === "/api/abundly/chat") {
        $input = file_get_contents("php://input");
        header("Content-Type: text/event-stream");
        header("Cache-Control: no-cache");
        header("Connection: keep-alive");

        $ch = curl_init("$BASE/chat");
        curl_setopt_array($ch, [
            CURLOPT_POST       => true,
            CURLOPT_POSTFIELDS => $input,
            CURLOPT_HTTPHEADER => [
                "Content-Type: application/json",
                "X-Agent-Access-Key: $API_KEY",
            ],
            CURLOPT_WRITEFUNCTION => function ($ch, $data) {
                echo $data;
                if (ob_get_level() > 0) ob_flush();
                flush();
                return strlen($data);
            },
        ]);
        curl_exec($ch);
        curl_close($ch);

    } elseif ($method === "GET" && strpos($path, "/api/abundly/images/") === 0) {
        $subPath = substr($path, strlen("/api/abundly/images/"));
        $ch = curl_init("$BASE/images/$subPath");
        curl_setopt_array($ch, [
            CURLOPT_HTTPHEADER    => ["X-Agent-Access-Key: $API_KEY"],
            CURLOPT_HEADERFUNCTION => function ($ch, $header) {
                if (preg_match("/^(content-type|content-length|cache-control):/i", $header))
                    header(trim($header));
                return strlen($header);
            },
            CURLOPT_WRITEFUNCTION => function ($ch, $data) {
                echo $data;
                return strlen($data);
            },
        ]);
        curl_exec($ch);
        http_response_code(curl_getinfo($ch, CURLINFO_HTTP_CODE));
        curl_close($ch);

    } else {
        http_response_code(404);
        echo "Not found";
    }
    ```

    Create `router.php`:

    ```php theme={null}
    <?php
    if (preg_match("#^/api/abundly/(status|chat|images/)#", $_SERVER["REQUEST_URI"])) {
        require __DIR__ . "/api/abundly.php";
        return true;
    }
    return false;
    ```

    Create `index.html` in the project root:

    ```html theme={null}
    <!DOCTYPE html>
    <html lang="en">
    <head>
      <meta charset="UTF-8" />
      <meta name="viewport" content="width=device-width, initial-scale=1.0" />
      <title>My Site</title>
    </head>
    <body>
      <h1>My Website</h1>
      <p>The chat widget should appear in the bottom-right corner.</p>

      <script src="https://app.abundly.ai/widget.js"></script>
      <script>
        Abundly.mountChatWidget({
          backendUrl: "/api/abundly",
          textOptions: {
            placeholder:    "Type a message...",
            bubbleLabel:    "Chat with us",
            headerTitle:    "Chat",
            welcomeMessage: "Hello! How can I help you today?",
          },
        });
      </script>
    </body>
    </html>
    ```

    Run:

    ```bash theme={null}
    ABUNDLY_SERVICE_URL=https://service.abundly.ai \
    ABUNDLY_AGENT_ID=your_agent_id \
    ABUNDLY_API_KEY=ak_your_key \
    php -S localhost:8080 router.php
    ```
  </Tab>
</Tabs>

Open `http://localhost:3000` (port `8080` for PHP). You should see the chat bubble in the bottom-right corner. Click it, type a message, and see the streamed response from your agent.

<Tip>
  These examples are minimal — they forward requests to Abundly but do not authenticate the browser caller. In production, add your own auth middleware (session cookies, JWT verification, etc.) to protect these endpoints.
</Tip>

## Configuration

`mountChatWidget` requires only `backendUrl` — everything else is optional. Use `textOptions` to customize labels and `uiOptions` to match your site's colors.

### Text options

All text options are optional and have sensible defaults.

| Property         | Default             | Description                                         |
| ---------------- | ------------------- | --------------------------------------------------- |
| `placeholder`    | "Type a message..." | Input field placeholder text                        |
| `bubbleLabel`    | "Chat about this"   | Text on the floating bubble                         |
| `headerTitle`    | "Chat"              | Title in the chat panel header                      |
| `welcomeMessage` | *(none)*            | Initial assistant message shown when the chat opens |

### UI options

All color options are optional and default to brand colors. Values accept any valid CSS — named colors, hex, rgba, or gradients.

| Property              | Default        | Description                        |
| --------------------- | -------------- | ---------------------------------- |
| `bubbleColor`         | Brand gradient | Floating bubble background         |
| `bubbleHoverColor`    | —              | Bubble background on hover         |
| `bubbleTextColor`     | `#fff`         | Text and icon color on the bubble  |
| `userBubbleColor`     | `#319795`      | User message bubble background     |
| `inputBorderColor`    | `#319795`      | Text input border when focused     |
| `submitColor`         | Brand gradient | Send button background             |
| `submitHoverColor`    | —              | Send button on hover               |
| `submitDisabledColor` | —              | Send button when disabled          |
| `headerColor`         | —              | Chat panel header background       |
| `headerTextColor`     | `#888`         | Header text and close button color |
| `linkColor`           | `#0d7a6e`      | Link color in assistant messages   |

## What the ready-made widget handles

`mountChatWidget` takes care of these concerns automatically:

* **Availability check** — calls `/status` before showing the bubble; stays hidden if the agent is unavailable or the daily limit is exhausted
* **SSE streaming** — character-by-character reveal animation as the response arrives
* **Processing indicator** — animated dots while the agent is working (tools, sub-agents, or waiting for a response). Internal reasoning text is never shown in the widget.
* **Markdown rendering** — safe HTML output with XSS protection
* **Image support** — URL rewriting, preloading, and authenticated image loading through the proxy
* **Mobile layout** — soft-keyboard detection and layout adjustment
* **Auto-resizing input** — textarea grows up to three lines
* **Rate limiting** — displays errors and suspends input on HTTP 429

`mountChatWidget` returns a handle with two methods:

| Method             | Description                                                                                           |
| ------------------ | ----------------------------------------------------------------------------------------------------- |
| `handle.reset()`   | Clears conversation history, errors, and suspended state. Restores the welcome message if configured. |
| `handle.unmount()` | Removes bubble, panel, backdrop, and injected styles. Idempotent, safe to call at any time.           |

## Custom UI with createClient

If you need full control over the chat interface — your own layout, animations, or interaction model — use `createClient` instead of `mountChatWidget`. It provides the same streaming and protocol engine without any DOM or styles.

```ts theme={null}
import { createClient } from "@abundly/widget";

const client = createClient("/api/abundly");
```

Or via script tag:

```html theme={null}
<script src="https://app.abundly.ai/widget.js"></script>
<script>
  const client = Abundly.createClient("/api/abundly");
</script>
```

The client exposes, among other things:

* **`client.checkStatus()`** — check if the agent is available
* **`client.sendMessage(text, callbacks)`** — stream a response via SSE with `onChunk`, `onProcessing`, `onDone`, and `onStreamError` callbacks
* **`client.resetSession()`** — clear the server-side session so the next message starts a new conversation
* **`client.renderMarkdown(text)`** — convert markdown to safe HTML (optional — use your own library instead if you prefer)
* **`client.stripPartialMd(text)`** — clean up half-formed markdown tokens during streaming

Conversation history is persisted server-side — you only need a local `Message[]` for rendering your UI. The client handles protocol details, session management, URL rewriting, and optionally markdown rendering. You own all markup and styling.

<Note>
  The methods listed above are the most commonly used — the full client API includes additional helpers for image authentication, blob URL management, and more. See the [`@abundly/widget` package on npm](https://www.npmjs.com/package/@abundly/widget) for the complete reference.
</Note>

The usual flow for a custom UI:

1. **Backend first** — same proxy as above (`/status`, `/chat`, `/images/<path>`)
2. **Install the SDK** — `npm install @abundly/widget`
3. **Create a client** — `const client = createClient("/api/abundly")`
4. **Build your component** — use `client.sendMessage` for streaming, `client.renderMarkdown` for replies, `client.checkStatus` for availability. Authenticated proxies and inline images require additional client helpers — see the [npm package docs](https://www.npmjs.com/package/@abundly/widget) for details
5. **Ship it** — mount wherever it should live; no `mountChatWidget` required

<Accordion title="Minimal React example">
  ```tsx theme={null}
  "use client";
  import { useState } from "react";
  import { createClient, type Message } from "@abundly/widget";

  const client = createClient("/api/abundly");

  export function MyChat() {
    const [messages, setMessages] = useState<Message[]>([]);
    const [streaming, setStreaming] = useState("");
    const [draft, setDraft] = useState("");

    async function send() {
      const text = draft.trim();
      if (!text) return;
      setDraft("");
      setMessages((prev) => [...prev, { role: "user", content: text }]);
      setStreaming("");
      // No need to pass conversation history — the server tracks it
      // via a session ID that the client manages automatically.
      const final = await client.sendMessage(text, {
        onChunk: (accumulated) => setStreaming(accumulated),
      });
      setStreaming("");
      setMessages((prev) => [...prev, { role: "assistant", content: final }]);
    }

    function resetChat() {
      client.resetSession();
      setMessages([]);
    }

    return (
      <div>
        {messages.map((m, i) => (
          <div key={i} className={m.role}>
            {m.role === "user" ? (
              m.content
            ) : (
              <div dangerouslySetInnerHTML={{
                __html: client.renderMarkdown(m.content),
              }} />
            )}
          </div>
        ))}
        {streaming && (
          <div className="assistant">
            <div dangerouslySetInnerHTML={{
              __html: client.renderMarkdown(client.stripPartialMd(streaming)),
            }} />
          </div>
        )}
        <input value={draft} onChange={(e) => setDraft(e.target.value)} />
        <button onClick={send}>Send</button>
        <button onClick={resetChat}>New chat</button>
      </div>
    );
  }
  ```
</Accordion>

For the full API reference, implementation help, TypeScript types, image auth helpers, and markdown renderer comparison, see [`@abundly/widget` on npm](https://www.npmjs.com/package/@abundly/widget).

## Authentication

If your proxy is same-origin and uses session cookies, no extra configuration is needed — cookies flow automatically.

For token-based or cross-origin setups, pass `headers` and/or `credentials` on the mount call. Both `mountChatWidget` and `createClient` accept the same options.

<Tabs>
  <Tab title="Bearer / JWT">
    Use the function form so the token is re-read on every request:

    ```tsx theme={null}
    mountChatWidget({
      backendUrl: "/api/abundly",
      headers: async () => ({
        Authorization: `Bearer ${await getAccessToken()}`,
      }),
    });
    ```
  </Tab>

  <Tab title="Static header">
    Use the object form when the value doesn't change:

    ```tsx theme={null}
    mountChatWidget({
      backendUrl: "/api/abundly",
      headers: { "X-API-Key": "ak_live_..." },
    });
    ```
  </Tab>

  <Tab title="Cross-origin cookies">
    Set `credentials: "include"` and ensure the proxy responds with `Access-Control-Allow-Credentials: true`:

    ```tsx theme={null}
    mountChatWidget({
      backendUrl: "https://api.example.com/abundly",
      credentials: "include",
    });
    ```
  </Tab>
</Tabs>

<Note>
  `headers` is applied to every request the widget makes (`/status`, `/chat`, and image loads). User-supplied headers override built-in headers with the same name. `credentials` maps directly to the `fetch` option.
</Note>

## Learn more

<CardGroup cols={3}>
  <Card title="API Access" icon="key" href="/features/agent-api-endpoint">
    Configure API keys, HTTP endpoints, MCP, and webhooks alongside the widget
  </Card>

  <Card title="@abundly/widget on npm" icon="cube" href="https://www.npmjs.com/package/@abundly/widget">
    Full API reference, TypeScript types, and advanced customization
  </Card>

  <Card title="Monitoring" icon="gauge-high" href="/features/monitoring">
    Review widget conversations in the portal chat list and monitor credit usage
  </Card>
</CardGroup>